
Monday, 22 October 2012
Oil Tank
To fuel the waste oil burner, we build a stand and ripped off a gas tank from an old tractor going to the dump. it has a vinyl tube attached to the original via a hose clamp and then a valve that then connects to a small copper pipe. I will have to improve the flow and i think the design will need to be replaced. for now, we pour the oil directly in. The feed system lets it idle though. Just by pouring it in it will last for five or so minutes before needing more.

Sandcasting forms: Open face
Here are some pictures of our open face greensand mold.

 The small one is for any extra aluminium. the larger form is tapered making it easier to remove. i just use a small finishing nail and tap it in to remove the form. The greensand was made from Home Depot playground sand and some clay. We need an improved mixture though.


Tuesday, 16 October 2012
Our Supply
Here is our supply of steel that we have been using for building our stuff. It is scrap steel my dad got from his work and is 1/4'' thick
.JPG)
Also here is my welding machine and our torch we have been using:
.JPG)
.JPG)
.JPG)
Also here is my welding machine and our torch we have been using:
.JPG)
.JPG)
Monday, 15 October 2012
Furnace and Burner Stands
I built some stands for our burner and furnace so you can move them easily with a dolly.
Measure the area of the dolly and build a little box that the burner can sit on. then the dolly with slide in and move it with ease considering the massive weight from the refractory.
.JPG)
Measure the area of the dolly and build a little box that the burner can sit on. then the dolly with slide in and move it with ease considering the massive weight from the refractory.
Here is the furnance sitting on the stand.
.JPG)
Pouring Tools
In about 2 hours I threw together some tools to make pouring the metal from the crucible easy. For our first pour, we had a cheap wire contraption thrown together in about 5 minutes. I made a more permanent pouring solution out of rebar. I cut a 55'' long section of rebar. I ended up heating up the parts I needed to bend with an oxy acetylene torch. If you dont have access to an oxy acetylene torch you will have to weld them together. I bent a 5'' handle at the top, and then bent 2 hooks at the end of each side.
.JPG)
.JPG)
.JPG)
.JPG)
.JPG)
I then made a single hook with a T shaped handle to hook onto a U shaped rebar hook at the bottom of the crucible.
.JPG)
Furnace lid
To help prevent heat loss, I cut a round plate with a hole in the centre big enough to see the crucible. I found 2 pieces of pipe and on just fits inside the other. I chose to do a swivel method.
NOTE! Make sure the swivel is at least opposite of the blast entrance.
I welded the larger pipe to the furnace itself and a small section of the larger pipe to the lid. Next I welded the smaller pipe inside of the larger pipe attached to the lid. the small pipe slides into the larger pipe on the furnace.
I welded a section of rebar the length of a handgrip to the lid so you can grab it to swivel.
It may get hot though.
.JPG) (The crucible is still our old version and wasnt functional yet)
(The crucible is still our old version and wasnt functional yet)
.JPG)
NOTE! Make sure the swivel is at least opposite of the blast entrance.
I welded the larger pipe to the furnace itself and a small section of the larger pipe to the lid. Next I welded the smaller pipe inside of the larger pipe attached to the lid. the small pipe slides into the larger pipe on the furnace.
I welded a section of rebar the length of a handgrip to the lid so you can grab it to swivel.
It may get hot though.
.JPG)
.JPG)
The Crucible
For the crucible, I welded 2 pieces of steel angle together that is about 1/4'', and then welded a bottom onto it. The crucible is about 8'' tall.
Next I welded a contraption of rebar for the crucible to hang in the furnace.
I cut a small steel pipe in half that was about 1.5'' long and welded it to the crucible for a spout.
on the back there is a U shaped hook to hook on and pour the molten metal.
.JPG)
Next I welded a contraption of rebar for the crucible to hang in the furnace.
I cut a small steel pipe in half that was about 1.5'' long and welded it to the crucible for a spout.
on the back there is a U shaped hook to hook on and pour the molten metal.
.JPG)
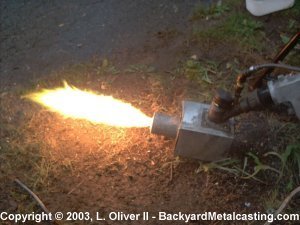
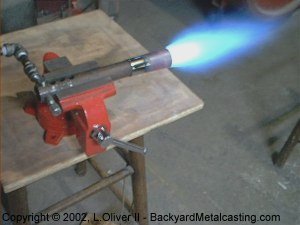
Our Burner
I have successfully built my waste oil burner and it has been fired up. I used the G5 design with slight modifications from the backyard metalcasting site. it is 10''x10''x8'' and lined with a good 1.5''-2'' of refractory.
The is a 2 inch pipe coming off of it and a 2 inch pipe going in for air.
this burner has been successfully tested.
Here are some of the pictures of the unfinished burner:
.JPG)
.JPG)
The is a 2 inch pipe coming off of it and a 2 inch pipe going in for air.
this burner has been successfully tested.
Here are some of the pictures of the unfinished burner:
.JPG)
Here is the refractory drying with the center form still in
.JPG)
Lining the furnace
Recently, I lined the furnace with our refractory.
I bought a bag of Playground sand from home depot, and mixed it half and half with clay.
I got the clay from under my friends deck and it was in a powder form. I mixed the dry clay and sand together and then wetted it to the right consistancy. I have heard of using cement also for bonding but I never did.
I let the refractory sit for about 5 days and it was only about an average of 5 degrees C out.
To bake the refractory I lit a fire inside it after taking out the form. I let it baked for about an hour.
Here is a shot of the inside of the furnace being baked,
.JPG)
.JPG) Before lining:
Before lining:
.JPG)
I bought a bag of Playground sand from home depot, and mixed it half and half with clay.
I got the clay from under my friends deck and it was in a powder form. I mixed the dry clay and sand together and then wetted it to the right consistancy. I have heard of using cement also for bonding but I never did.
I let the refractory sit for about 5 days and it was only about an average of 5 degrees C out.
To bake the refractory I lit a fire inside it after taking out the form. I let it baked for about an hour.
Here is a shot of the inside of the furnace being baked,
.JPG)
.JPG)
.JPG)
Wednesday, 20 June 2012
Step 3 Heating
For our furnace, we will make the fueling interchangeable, so you can run it off of propane, and waste oil.
 |
| Waste oil burner |
 |
| Propane burner |
Friday, 15 June 2012
Scrap Aluminum for Melting
Here are forms of aluminum you can find around the house:
 |
| Pop Cans |
The two problems with melting down pop cans:
- They produce a lot of slag, which will need to be skimmed off
- You need a lot of cans to fill the crucible
 |
| Scrap aluminum |
The great thing about scrap aluminum is that you can find use for it.
 |
| Push mower engine block |
You Can melt down your old mower engine block instead of throwing it out. also it gives you a fair amount of aluminum.
 |
| Computer Heat sink (cooling fin) |
If you have an old computer you can melt down its cooling fin
Aluminum
Once your furnace is eventually running, you will probably want to melt down scrap aluminum you hav found.
Here is some tips for testing if the metal is aluminum or not:
Here is some tips for testing if the metal is aluminum or not:
- Non magnetic
- Light metal
- Easily scratched with steel
- Easily carved with a sharp knife
- Silver color (under any coatings)
- Melts about 600C
- Tin/lead solder will not stick (or just barely) to it
Tuesday, 12 June 2012
Our Furnace - Step 2
Next, we found a plastic pipe that will be the center form. it will give roughly 1.5'' of refractory.
We packed our clay/sand mixture into the bottom of the pipe.
We Next put in the center form and packed in the mixture.
Now it will have to harden and then we can cut and drill the holes for the blast pipe and drain pipe. The center form will stay in for about 5 days.
You may find helpful resources in the ads at the top.
Our Furnace: Step 1
The first process in building our furnace is building the outer casing which will end up being lined with the home made refractory.
I started with a metal pipe, roughly 10 1/2'' in diameter and 1/8'' thick. I cut the pipe down to 14 inches in height with an oxy-acetylene torch (zip cut would work fine).

Next I found a metal plate for the bottom of the casing also around 1/8'' thick. I set the pipe onto the metal plate and welded the plate to the pipe.

Next I built the cover at the top. From the same plate I marked out a circle 10 1/2'' with a smaller circle '' in diameter. I cut the cover out with the oxy-acetylene torch.

The tools you will need:
The welding machine is foe making any welds
the torch is for cutting the larger pipe, and the cover
I started with a metal pipe, roughly 10 1/2'' in diameter and 1/8'' thick. I cut the pipe down to 14 inches in height with an oxy-acetylene torch (zip cut would work fine).

(This is not the Same Pipe I Used)
Next I found a metal plate for the bottom of the casing also around 1/8'' thick. I set the pipe onto the metal plate and welded the plate to the pipe.


The tools you will need:
- Grinder
- zipcut
- Grinding disc
- Welding machine
- welding rods
- Oxy- acetylene torch or plasma torch
The welding machine is foe making any welds
the torch is for cutting the larger pipe, and the cover
We will take a picture of where we are at and post it.
Wednesday, 6 June 2012
Our Youtube Channel
You can check out our youtube channel at: The Home Foundry where you can watch our videos.
Subscribe to:
Posts (Atom)